Saptak's Blog Posts
Anonymous Chat using OnionShare
Posted: 2021-02-26T15:22:50+05:30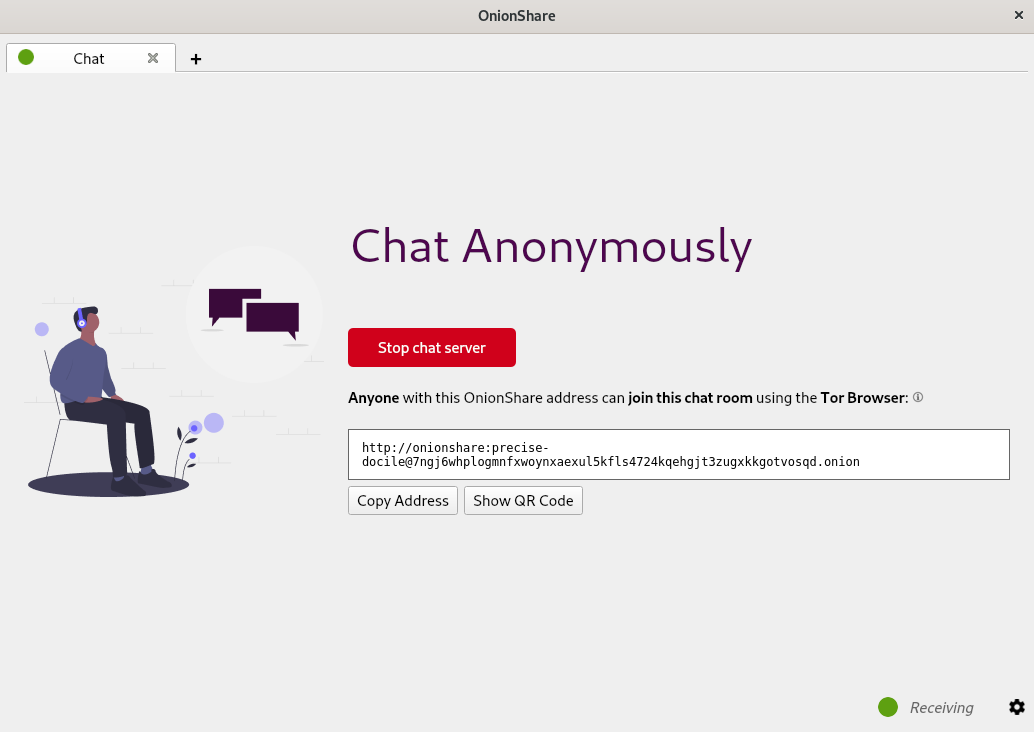
So the new OnionShare is out and it has a bunch of exciting new features and some improvements in the UI/UX designs of the tool. One of the main new features that I helped build was the anonymous chat feature in OnionShare. Just like the other modes (share, receive, and website), there is now a chat mode. So if you want to start a chat service, you just start the chat server, share the onion address of the server with people you want to chat with, everyone opens this onion address in Tor Browser and voila! You have an anonymous chat.
Read moreAdding CSP hashes for styles in Chromium
Posted: 2021-01-17T14:13:55+05:30Content Security Policy (or CSP) is a way of avoiding certain types of website-related attacks like cross-site scripting and malicious data injections. It is a way by which website developers can tell the browser what content origins are approved so that everything else is blocked. One needs to add a Content-Security-Policy HTTP header mentioning the sources which they allow for loading scripts, styles, images, etc.
To read in detail about CSP, check Content Security Policy Level 3 working draft.
We are going to discuss here why sha256 hashes often don't let inline styles to not pass in chromium browsers. Chromium browser console complains about the style-src hashes mismatch even though it shows them to be the same. Why? And how to solve it?
TL;DR: If using <style>, use style-src. If using style="" attribute in HTML tag, use style-src-attr
Now, if you are interested in more information, let's dive a little deeper into what's going on.
Read moreDo not fear, Tumpa is here
Posted: 2021-01-03T18:18:08+05:30Anyone who has ever created an OpenPGP key knows that it is a terrifying day in their life. Be it someone skilled in computers, or someone who just cares about their privacy, creating OpenPGP key is a fearsome incident. Add moving all subkeys properly to yubikey along with managing all passphrases, and the terror just increases manifold.
Well, do not fear, Tumpa is here.
Read moreHandling nested serializer validations in Django Rest Framework
Posted: 2020-05-03T01:22:50+05:30I understand that the title of this post is a little confusing. Recently, while working on the Projects API in Weblate, I came across an interesting issue. The Projects API in Weblate allowed you to get an attribute called source_language. Every project has only one source_language and in the API, it was a read-only property.
{
  "name": "master_locales",
  "slug": "master_locales",
  "web": "https://example.site",
  "source_language": {
    "code": "en",
    "name": "English",
    "direction": "ltr",
    "web_url": "http:/example.site/languages/en/",
    "url": "http://example.site/api/languages/en/"
  },
  "web_url": "http://example.site/projects/master_locales/",
  "url": "http://example.site/api/projects/master_locales/",
  "components_list_url": "http://example.site/api/projects/master_locales/components/",
  "repository_url": "http://example.site/api/projects/master_locales/repository/",
  "statistics_url": "http://example.site/api/projects/master_locales/statistics/",
  "changes_list_url": "http://example.site/api/projects/master_locales/changes/",
  "languages_url": "http://example.site/api/projects/master_locales/languages/"
}
As you can see, unlike the other relational fields, it's not a HyperLinkedIdentityField. It uses the nested language serializer to show all the attributes of the source_language.
Now, previously, when a project was created via API, a default language was always assigned to the project and there was no way to define the source_language while creating the project via API.
Creating Custom Whoosh Plugin
Posted: 2020-04-19T13:16:52+05:30Recently, while trying to work on a query parser feature in Weblate, I came across this search engine library called Whoosh. It provides certain nice features like indexing of text, parsing of search queries, scoring algorithms, etc. One good thing about this library is most of these features are customizable and extensible.
Now, the feature I was trying to implement is an exact search query. An exact search query would behave in a way such that the backend would search for an exact match of any query text provided to it instead of the normal substring search. Whoosh provides a plugin for regex, which can be accessed via whoosh.qparser.RegexPlugin(). So we can technically go about writing a regex to do the exact match. But a regex search will have worse performance than a simple string comparison.
So, one of the ways of doing a new kind of query parsing is creating a custom whoosh plugin. And that's what this blog is going to be about.
Read moreConfiguring Jest with React and Babel
Posted: 2019-08-26T11:38:00+05:30But the problem appears when we try to write Jest and Enzyme tests with them. Because Babel can now longer understand and parse the imports. And without Babel parsing them and converting to ES5, jest cannot test the components. So we actually need a mix of Babel configuration and Jest configuration.
Note: This post assumes you already have jest, babel-jest and babel/plugin-transform-modules-commonjs packages installed using your favorite javascript package manager.
Basically, the workaround is first we need to resolve the cleaner imports into the absolute paths for the import using Jest configurations, and then use the Babel configurations to parse the rest code (without the modules) to ES5.
The configuration files look something like these:
babel.config.js
module.exports = api => {
  const isTest = api.env('test');
  if (isTest) {
    return {
      presets: [
        [
          '@babel/preset-env',
          {
            modules: false,
          },
        ],
        '@babel/preset-react',
      ],
      plugins: [
        "@babel/plugin-transform-modules-commonjs",
      ],
    }
  } else {
    return {
      presets: [
        [
          '@babel/preset-env',
          {
            modules: false,
          },
        ],
        '@babel/preset-react',
      ],
    }
  }
};
jest.config.js
module.exports = {
  moduleNameMapper: {
    '^~/(.*)$': '<rootDir>/path/to/jsRoot/$1'
  }
}
So let's go through the code a little.
In babel.config.js, we make a check to see if the code is right now in test environment. This is helpful because
- Jest sets the environment to "test" when running a test so it is easily identifiable
- It ensures that the test configuration don't mess up with the non test configurations in our Webpack config (or any other configuration you are using)
In the test configuration for Babel, we are using a plugin "@babel/plugin-transform-modules-commonjs". This is needed to parse all the non component imports like React, etc. along with parsing the components from ES6 to ES5 after jest does the path resolution. So it helps to convert the modules from ES6 to ES5.
Now, let's see the jest.config.js. The jest configuration allows us to do something called moduleNameMapper. This is a very useful configuration in many different usecases. It basically allows us to convert the module names or paths we use for module import to something that jest understands (or in our case, something that the Babel plugin can parse).
So, the left hand part of the attribute contains a regular expression which matches the pattern we are using for imports. Since our imports look something like '~/path/from/jsRoot/Component', so the regular expression to capture all such imports is '^~/(.*)$'. Now, to convert them to absolute paths, we need to append '<rootDir>/path/to/jsRoot/' in front of the component path.
And, voila! That should allow Jest to properly parse, convert to ES5 and then test.
The best part? We can use the cleaner imports even in the .test.js files and this configuration will work perfectly with that too.
Making cleaner imports with Webpack and Babel
Posted: 2019-08-10T12:30:00+05:30But a better, more cleaner way of writing ES6 imports is
This hugely avoids the bad relative paths for importing depending on where the component files are. Now, this is not parse-able by babel itself. But you can parse this by webpack itself using it's resolve attribute. So your webpack should have these two segments of code:
and
The {modules: false} ensures that babel-preset-env doesn't handle the parsing of the module imports. You can check the following comment in a webpack issue to know more about this.
What's a ShadowDOM?
Posted: 2019-05-24T23:24:00+05:30However, none of the browsers allowed developers to write their own custom shadow DOM (though google chrome had a v0 version implemented). I stumbled upon shadow DOM again while looking at an issue in jQuery to fix. So now, since 2018, most of the browsers have started supporting shadow DOM APIs and hence jQuery needed to implement support for that too.
 |
| https://caniuse.com/#feat=shadowdomv1 |
What's a DOM?
<!DOCTYPE html>
<html>
  <head>
    <meta charset="utf-8">
    <title>Title</title>
  </head>
  <body>
      <div>
        <h1>This is header</h1>
        <p>This is a
          <a href="https://www.saptaks.blog">
            link
          </a>
        </p>
      </div>
  </body>
</html>
So, visually you can show the DOM structure as something like:

Shadow DOM
Now, shadow DOM allows us to create separate hidden DOM trees that are attached to the elements of a regular DOM tree. This allows you to implement functional encapsulation, i.e. someone parsing the regular DOM tree and applying styling to the regular DOM tree doesn't know or affect the properties and functionalities of the shadow DOM tree. Hence you use the shadow DOM without knowing the intricate details of how the DOM is implemented. This is important, because this follows the basic ideas of Object Oriented Programming.The shadow DOM tree starts with a shadow root and can then have any regular DOM element attached underneath it.
Let's see an example:
HTML
<!DOCTYPE html>
<html>
  <head>
    <meta charset="utf-8">
    <title>Title</title>
  </head>
  <body>
      <div id="shadowHost">
      </div>
  </body>
</html>
JavaScript
const shadowHost = document.getElementById('shadowHost');
const shadowRoot = shadowHost.attachShadow({mode: 'open'});
shadowRoot.innerHTML = '<h1>Hello Shadow DOM</h1>';
So, this will create a shadow DOM. Visually you can represent this as:

So, as you can see, there are few different parts in a shadow DOM apart from it being just another DOM.
- Shadow tree: The DOM tree inside the shadow DOM.
- Shadow boundary: the place where the shadow DOM ends, and the regular DOM begins.
- Shadow root: The root node of the shadow tree.
- Shadow host: The regular DOM node that the shadow DOM is attached to.
- Shadow child: The tree below the shadow root node.
- The different form tags such as <input>, <textarea>, etc or any other html tag for which the browser implements its own Shadow DOM
- Elements like <img> or <br> or <hr> which are usually self enclosing tags and don't usually contain a child node.
Why do we need Shadow DOM anyways?
- The browser implements Shadow DOM for various different tags such as <video>, <audio>, <input>, <select>, etc.
- You can make your own custom Shadow DOM when you need to create an element that you want to not be modified by the styling of remaining DOM.
- You can also use Shadow DOM, when you want to create a separation of a particular DOM element from the main DOM element.
What to expect from GSoC?
Posted: 2019-03-10T16:06:00+05:301. Don't "Crack" GSoC
Unlike many other computer science and engineering programs, there is no pill that you take and you magically get selected overnight. Nor is there a particular curriculum or book that you can read over and over and practice and get selected.Getting selected in GSoC is a gradual process that needs lots of patience and contribution and the slow but steady accrual of experience. So if you are actually reading this blog in an attempt to know how to get selected, you are kind of late in the process. Better late than never, though.
The only way you get selected in GSoC (at least in most organisations) is via Open Source Contributions. So now you might think, okay, open source contribution is the curriculum.
Yes and no.
If you consider open source as yet another chapter in your coursework, then getting started with open source contribution might be difficult.
There's a lot involved; from clean, readable coding to best practices to communication. It is an entirely new way of working (way of life?) that is going to last you forever and help you in the long run.
For many, like us (like me personally), it's more than even that. It's a belief, a principle, a movement. I am going to talk more about that in the points below.
So even though many blogs will tell you exactly how to pick an issue, and show many contributions and help you pick an easy organisation, I’d encourage you to enjoy the process and get involved wholeheartedly in it. Contribute to the project and organisation you feel excited about. Become a part of the organisation, get to know folks, learn as much as you can, expand your pool of knowledge. If after all that, the worst happens and you are not selected for GSoC, you can still keep contributing to a major open source project which is awesome!
2. Do it for Open Source, Not for Money
I know money is a really important part of life (and I am not denying that) and GSoC money is definitely tempting. So I am not complaining about the money being an intrinsic motivation. What I am trying to say is if you do GSoC only for the money, and stop contributing to Open Source after these 3 months, then the purpose of GSoC is lost.GSoC, I believe, is meant to be a platform that helps you get started in your Open Source journey. It is that small little push that you need to start contributing to open source projects. Finding and contributing to an organisation all on your own might be a little difficult, GSoC provides you with a platform that helps you find them more easily and have a higher chance of starting your open source contribution in major organisation than you would normally do.
So use GSoC as a vehicle to begin your journey in the open source world. Once you start seeing it from that perspective, you will, hopefully appreciate the principles of open source and keep contributing to the open source world.
Open source projects appreciate great developers like you, so come be a part of it.
3. Take PR Reviews Positively
Now, if you have already grasped the previous points, you know GSoC is only the beginning. Apart from making all projects by you open source, a really important part of the journey is contributing to various wonderful open source projects, which is actually going to be most of your GSoC. And with contribution, comes pull requests (or patches in some cases).Most times, you will receive plenty of comments and reviews on your pull requests. I have seen many folks get irritated. Many in face, feel that if you can't get a pull request merged without too many reviews, then that organisation is hard to contribute to, in GSoC. This causes many to try for organisations where pull requests get easily merged.
Don't be discouraged by the reviews.
Instead, use them as a learning opportunity. Most reviews are very constructive criticism that are will serve you well throughout your life. It will help you write code that is more readable, more efficient and code that works best in production both in terms of performance and maintainability. In GSoC you get to learn all this directly from upstream projects with super awesome developers and coders … and PR review is where you learn the most.
4. Collaborate, Don't Compete
Over the years, as both student and mentor in GSoC, I’ve seen participants duking it out for issues or work in organisations and projects. This is mainly because everyone has this feeling that if they solve more issues and bugs, they have a higher chance of getting selected or passing the evaluation. But at the same time, this often causes frustration if a PR is getting too many comments. Also, participants tend to start working on something different, leaving their previous work incomplete.All these will actually just create a bad impression to the mentors and others in the organisation. It will deprive you of lots of peer learning opportunities because you will always be competing with everyone. So, try your best to collaborate with other participants and even the mentors and other contributors.
Collaboration is a central principle in the Open Source community at large. Collaborating with each other not only helps you learn a lot from your peers but also leads to a better, much cleaner project. Collaborate not only on code, but on shaping the best practices of a project, on blogs, on writing documentation and setting guidelines. You will also have a better overview of the entire project rather than just the small piece you work on.
Remember, GSoC is not a competition where you need to be the top scorer to win. Everyone is a winner if they contribute to the projects and help in growing the project. Believe me, most organisations will pass you even when you don't complete the entire proposal you made, if you made other quality contributions to the project and they feel that your work has helped in furthering development of the overall project.
5. Be Part of the Community
While being a part of GSoC, don't just code. Go, be a part of various open source communities. When you are selected for a particular organisation, be always active in their communication channels, be it IRC or slack or gitter or what have you. Help newcomers get started with the project, attend team meetings, make friends, and communicate with everyone. If possible, try to attend different meetups and conferences near your area.These will help you network and make friends with a lot of people from different parts of the open source communities and you will get to learn even more. The best part about open source is that it allows you to grow beyond any boundaries and being part of different communities is one of the best ways to do this. Not only will you get to learn a lot code wise, but also about different aspects of life and technology and incidents that might help you shape your future.
And, most importantly, continue being involved in these communities even after GSoC ends. I have told plenty of folks, plenty of times before and I can't emphasise enough that GSoC is just the beginning of your journey. Your journey with open source coding and the communities, doesn't end after the 3 months of GSoC. It starts expanding. Yes, due to various circumstances, you might not always be able to actively contribute code to an open source project, but try to carve out time to help others in communities get started. Try to apply the lessons you learn in the communities, in your office work or university projects and when you do get time, contribute to the open source!
iTerm + zsh + tmux for your MacOS
Posted: 2018-10-11T20:34:00+05:30ZSH
brew install zsh
Once you have it installed, you can run the command `zsh` to start the Z Shell.
Oh My Zsh
sh -c "$(curl -fsSL https://raw.githubusercontent.com/robbyrussell/oh-my-zsh/master/tools/install.sh)"
Once you have installed, you can open the `~/.zshrc` file to add plugins like git, change themes and modify stuff. Here is a complete documentation and available template links.
Tmux
brew install tmux
After that, you need to configure your tmux to make it comfortable for your key bindings. One good link to get started I guess is this.
Integrate ZSH and Tmux
chsh -s `which zsh`
2. Make tmux open with zsh. To do this, put the below line in ~/.tmux.conf:
# set shell
set -g default-shell /bin/zsh
3. Kill all previously running tmux instances.
killall tmux
4. Close iTerm2 and restart it.
Now, your terminal should start with zsh. When you enter into tmux, it should go into tmux session along with zsh instead of bash.
And Voila! There you have a nice productive terminal. Or so I feel.