Saptak's Blog Posts
In The Heat of Code : A Mentor's POV
Posted: 2017-03-28T21:23:00+05:30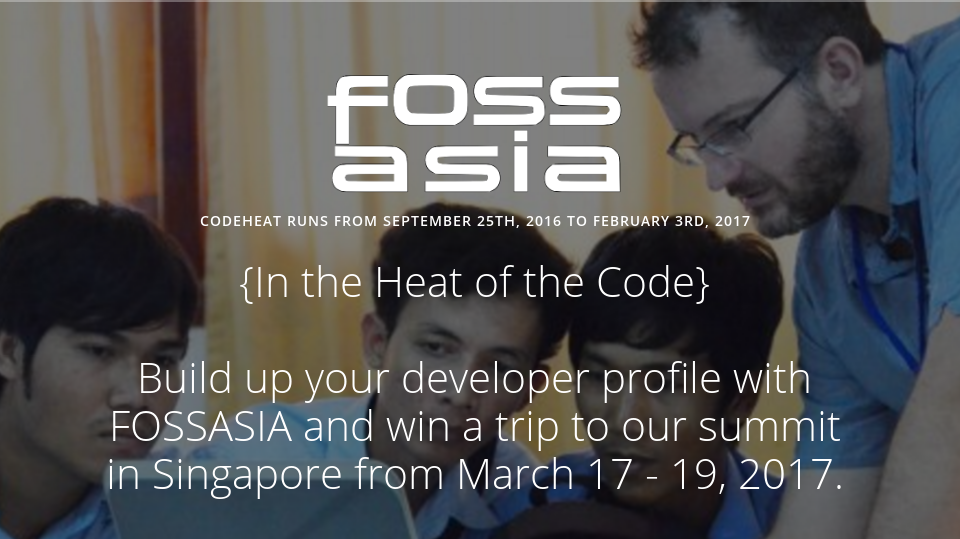
In The Heat of Code or CodeHeat, as it is famously known right now started when Mario Behling started a discussion with me about how to encourage continuous contribution to projects by FOSSASIA even after GSoC. The scenario was most of the time students or participants stopped contributing after Google Summer of Code ended because there wasn't much incentive or profit of their's in continuing with the projects. So we decided to give people a reason to continue. In fact why just continue? Why not get completely new contributors??? And without distinguishing whether they were in university or school or working professionals. So we got others in FOSSASIA team also to drafting the idea into a proper event. And thus began CodeHeat. The official announcement was made in September 20th. The coding started on September 25th. I was to be a mentor in the Open Event Organizer Server project. And the registrations started coming.
We had a huge number of registrations but sadly there were very few contributions in the Open Event Organizer Server project. Most of the participants were more interested and enthusiastic in contributing to android app development and our project got a little less attention. Nonetheless, I and Niranjan continued our own contributions and reviewed occassional pull requests we received. It was almost end of November and though CodeHeat was going great I wasn't very happy as a mentor since our project didn't get much contributors.
Then in the beginning of December few of my friends from college asked me about codeheat and said they were interested in Python. I was delighted and introduced them to Open Event Organizer Server project. Soon there were participants from other colleges as well. We started getting more and more contributions. Then there were 2 participants - Shubham Padia and Medozonuo who were not only contributing but were almost competing with each other. The result of their competition was we got huge number of awesome code contributions from both of them in all areas from frontend to backend to even database improvements.
From implementing the entire discount and access code system to providing more options and making it more customizable for CFS to solving tons of frontend bugs and export functionality, I and Niranjan almost started having a hard time reviewing their PRs since there were tons of them. I was delighted. The project was nearing release more and more and it was reaching a stage where we can actually make an attempt to use it in production. I and Niranjan often discussed how we hoped these 2 make to the top ten in CodeHeat. It was almost like reliving GSoC from a mentor's perspective.
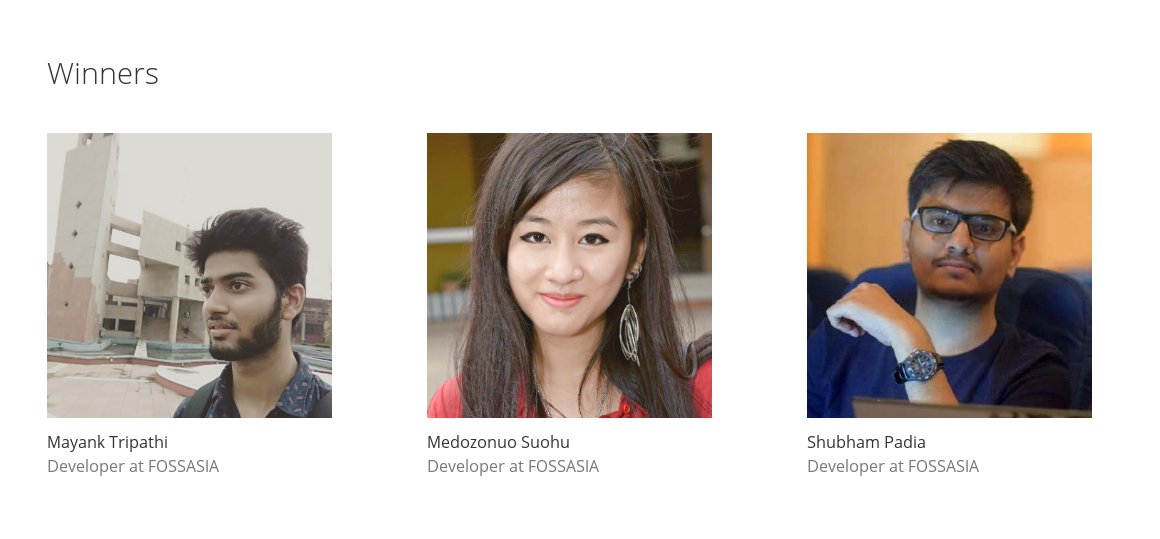
Finally it was result time. Though it would be wrong to say I was nervous but I surely was excited to know whether any of the contributors of open event organizer server project made it to the top ten. To my utter happiness not only did they make to top ten but Shubham Padia and Medozonuo made it to the top 3. I was really happy for them since they truly deserved it. I guess Niranjan would agree with me in saying that we truly loved mentoring them. It wasn't like they knew each and everything but they picked up stuff pretty quickly and showed their contribution in all aspects of the code. Also, we were later able to get their help in reviewing other's code which was really helpful for me and Niranjan.
It was a really wonderful experience, mentoring in CodeHeat, reviewing PRs day and night, sharing knowledge with others. I simply loved the experience. The icing on the cake was 2 of the top 3 were contributors to open event organizer project. A lot many mentoring experiences are on the queue and I am really looking forward to them.
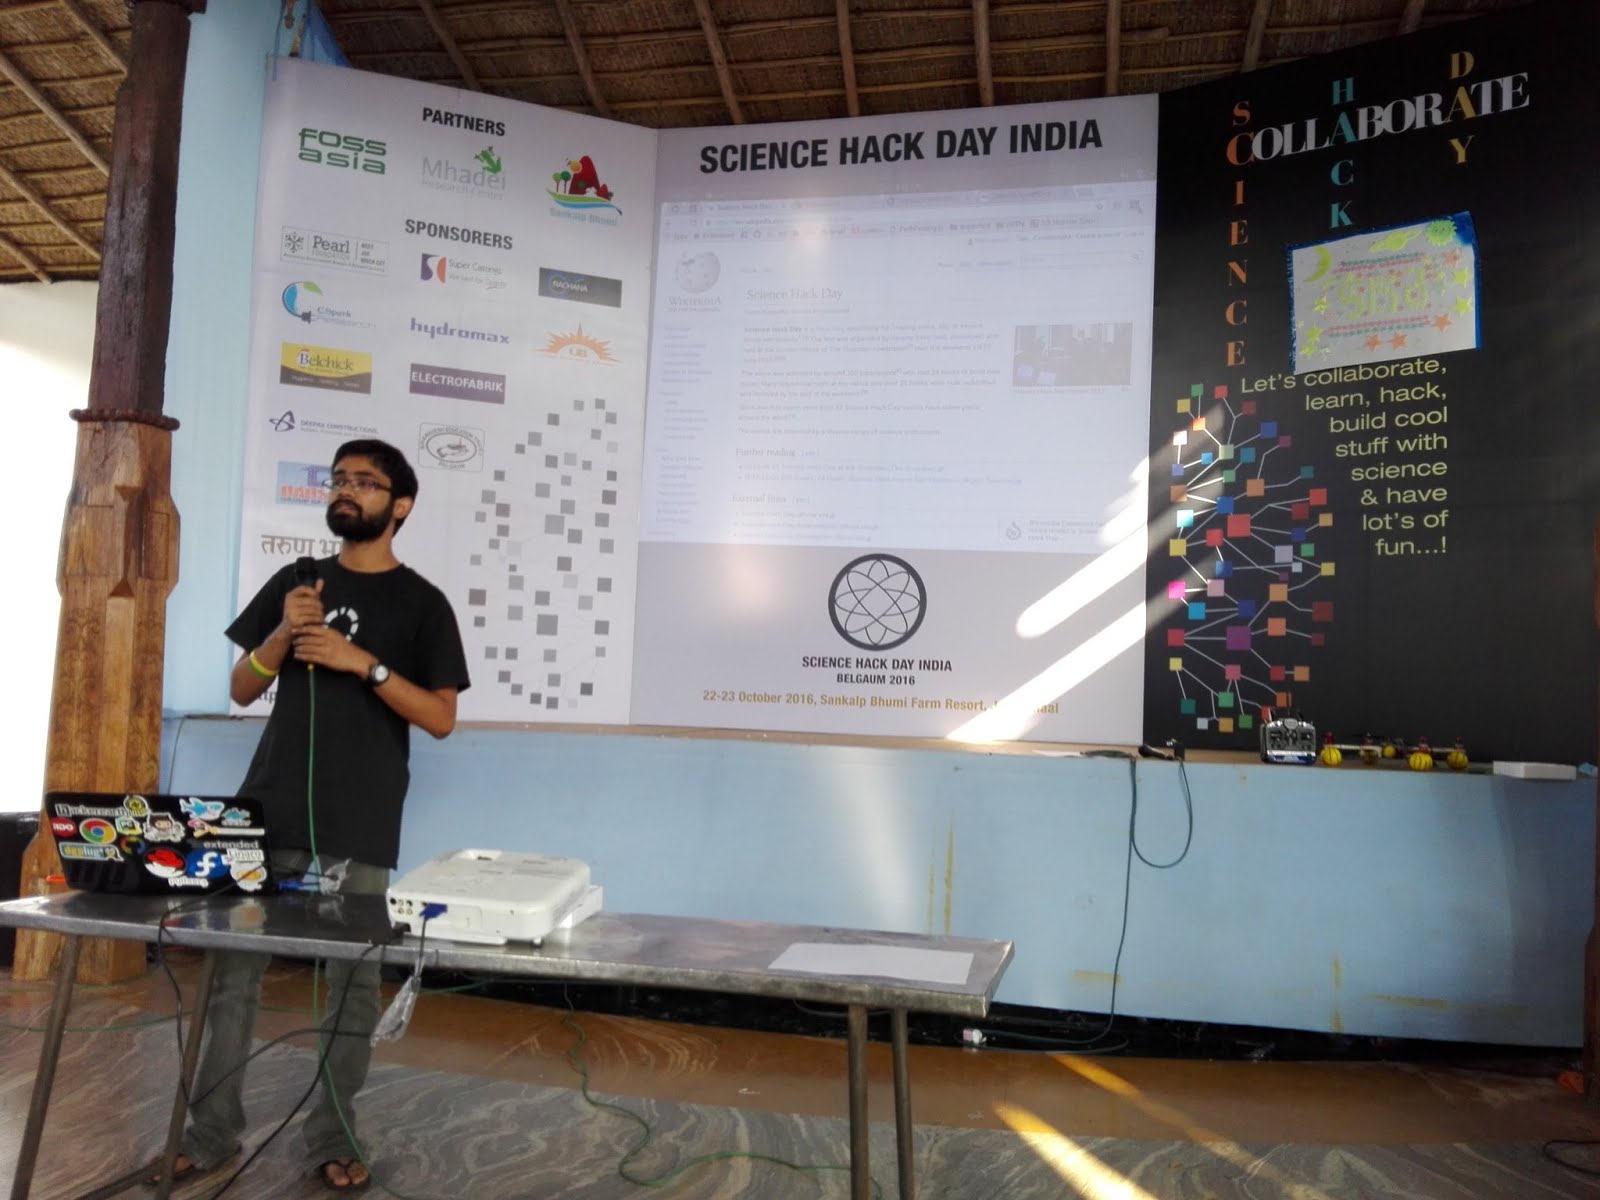
Science Hack Day, Belgaum, India
Posted: 2017-02-08T11:00:00+05:30
I know I am pretty early to write this blog for ScienceHackDay India 2017, but got some free time I suppose.
Last year after completing GSoC successfully with FOSSASIA, my main aim with all the newly earned money was to attend conferences and meet like-minded people over hackdays and meetups. It started with PyCon India. Now it was time for ScienceHackDay, India...
So, as soon as I came to know about Science Hack Day, I had my tickets booked and ready to leave. To be honest, I had very little what's going to happen, who all were coming and all. I was just trying to hide my introvert self and get to meet new people.
Day 1:
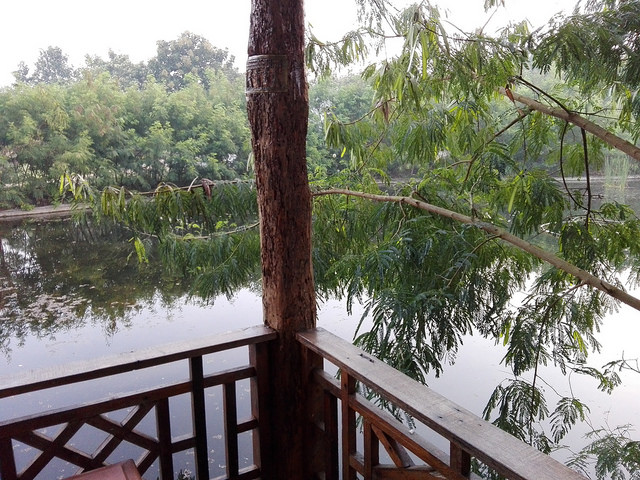
The journey from Allahabad to Belgaum was pretty hectic. A train from Allahabad to New Delhi, then a flight from New Delhi to Mumbai and then a flight from Mumbai to Belgaum. But after landing in airport itself, it lifted up my mood after the tiring journey. Small hillocks all around and not a metro city. What can be better for a quick getaway? On the way, I came to know Sayan Chowdhury and Kushal Das were also going to be there. Little did I know that I was actually going to share room with them. The first word that came to my mind on reaching the destination was "WOW". It was pretty outside city, no usual cacophony, and the resort was awesome. The place where I was staying was designed in the form of a lake house.
So after reaching, I was really excited to meet Hong Phuc Dang. She is the founder of FOSSASIA and I have been associated with FOSSASIA for quite some time now, and heard a lot about her and also talked with her online, but now was the time. I won't lie, I was a little nervous. But then she came and casually asked whether I wanted to go for kayaking with them. I was like, REALLY!! Well, why not... She was so friendly and nice, I felt a little embarrassed to feel nervous actually. And yes, also realised I was terrible in kayaking...
Then, over dinner, got to meet some really really really awesome people. Everytime Kushal or Sayan introduced me to someone or I talked with someone, it was like WOW, his/her work is so cool.......
Day 2:
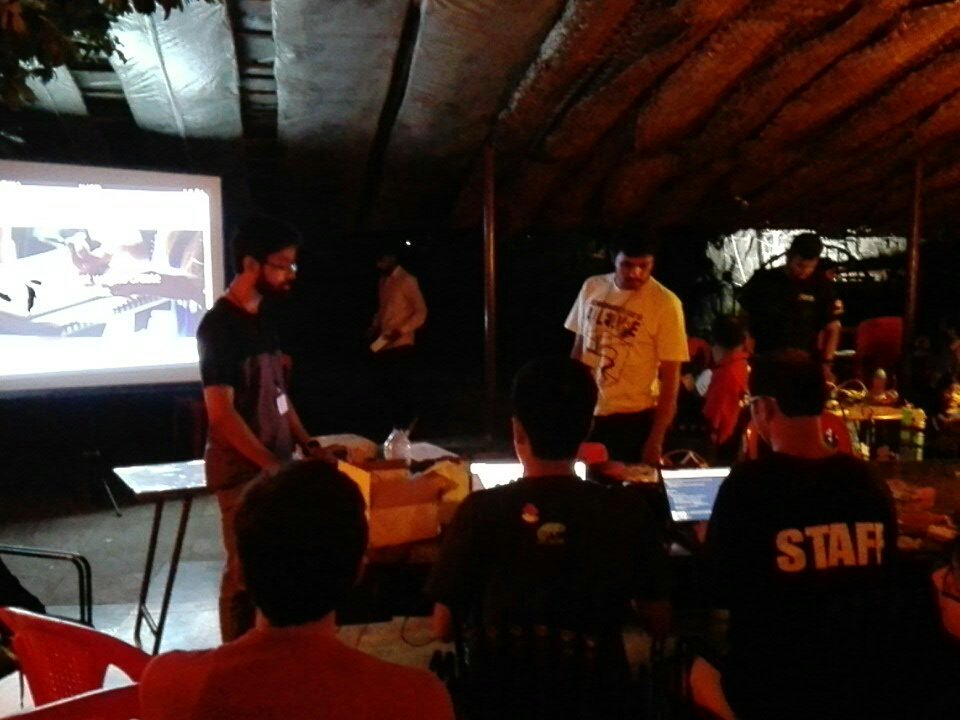
Started with inauguration. Things were going pretty well until Hong Phuc introduced me as a senior software developer in FOSSASIA to the crowd. I was like, was that my name?? Surely??? Needed someone to pinch me at that time actually. After the inauguration, it was hack time. So the thing was there were teams to be formed with one of who visited the hack day from outside and the participants. I was the only guy planning to do something with software, while others were trying to do hardware stuff ( the only hardware hack I can do is light a LED ). So I was joined by some interested participants and I started giving them a brief introduction about chrome extension and the plans of the hack. So the hacks continued and I kept peeping into other's works... It was all so confusing (that's the word I feel for hardwares, always....)
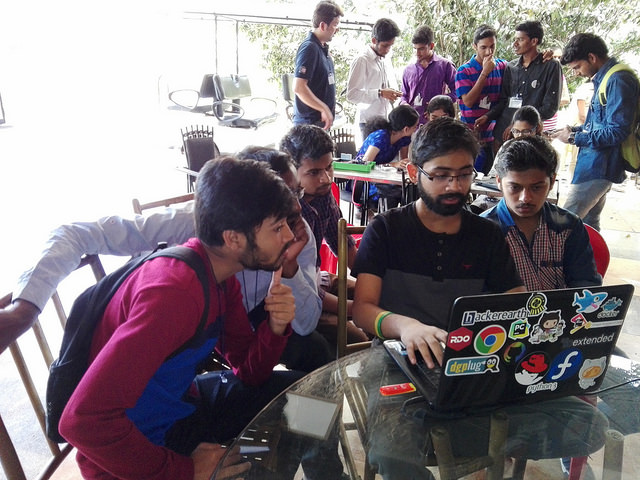
Evening we had lightning talks. I gave a lightning talk on Open Event Orga Server, my Google Summer of Code project with FOSSASIA. There were many other projects and new things that I came to know over those lightning talks. And and and and.... Praveen Patil did a laser show to explain Physics!!! I am so jealous of the students whom he teaches Physics to....
Day 3:
Wrap up day... Time to complete the project... And the others in my team didn't turn up. Weird experience but then Hong Phuc said you are the only software hack, so you are doing. That was all the motivation needed. I quickly started working on my chrome extension. It was a text to speech conversion of any wikipedia page in any language. Then it was time for presentation. I was nervous as always but didn't even think about winning so wasn't that tensed after all...
People were showing their hacks and I was like I should have been a participant and joined their team. It was result time and I was just chatting with Sayan about some random things I don't remember now. And suddenly, out of the blue, my project was declared as Best Education Hack. I was shocked, happy, surprised...
Later on, Rahul Prabhukhanolkar told us about bat detectors. It was pretty interesting to know that there were actually bats present there also and we didn't know at all.
Time to return
So it was time to return. Had a flight in the morning. So had breakfast and left for airport with Praveen. Entered airport, and I MISSED THE FLIGHT.... Seemed the flight was preponed and the airlines was ignorant enough to not inform us in anyway... Praveen was helpful enough. Took me for a small tour in his car, had some awesome dinner and then caught a bus to Pune. From Pune, got a flight to New Delhi and then a train from New Delhi. All tired, but full of excitement.
My purpose was fulfilled... Got to meet some awesome people... More than coding and tech goals, I got some life goals after listening to their experiences... Looking forward to meet them again...
PyCon India 2016 : A weekend to remember
Posted: 2016-10-05T01:29:00+05:30
PyCon India is one of the best experiences I have had in recent past. PyCon India this year was held in New Delhi from 23rd September to 25th September, 2016. Three days filled with learning, interaction, meeting like minded people; couldn't have asked for anything more. The entire was one of python and development and I loved it.
Day 1 - Devsprint
The first day was special. I was conducting a devsprint on my GSoC project, Open Event Organizer Server under FOSSASIA. To represent the project at such a huge platform was a real great honor for me. The devsprint was a real good experience. Pitched about the project to an audience which comprised of people from many different organisations who were much more knowledgeable in Python than I am. I got to meet a few developers, helped them setup the project and walked them through the various components of the project, told them about In the Heat of Code, a contest by FOSSASIA which involved my project. To see so many eager faces willing to contribute was such a great experience. Also, got to meet a lot of great python developers and discuss my project with them. All in all an experience to remember.
Apart from the DevSprint, met some fellow GSoCers, organisation heads and pythonistas, had an awesome lunch and also had the experience of volunteering. The day ended with a volunteers assembly where plans of the next 2 days were discussed. The first day had pretty much established that the next 2 days are going to be awesome.
After the closure, had the opportunity of going out with Sayan Chowdhury who is associated with both FOSSASIA and Fedora Projects and other Fedora Project contributors. It was a great meetup between the people of 2 organisations and led to discussions about various things. Later we went together to grab some food together and enjoy ourselves. After that, it was time to call the day off.
Day 2 - Volunteering Experience
Woke up early in the morning all excited. This was a big day. First chance of volunteering in a PyCon, meeting some awesome people and pythonistas. Who wouldn't be excited, right? So, went to JNU Convention Center, quickly completed my breakfast and was there in Audi 2 ready for the awaiting experience to blow me away. Meanwhile, booths of RedHat, Digital Ocean, goibibo, JetBrains, ZeOmega and IAMAI. I roamed about in the booths meeting representatives of each organisations, knowing about what and how they work on various things - from containers to cloud services to IDE, it was simply a great learning experience. Plus, got goodies from the booths. So that was awesome as well.
After that it was time for the keynote by Baishampayan Ghose or better known as BG which was followed by some real awesome talks - some of them I understood, while others interested me to learn new things. Apart from the talks, attended the open space and lightning talks as well while also meeting people like Kushal Das whom I have intended to meet for quite some time.
At the end of the day, it was time for volunteer speaker party at Bar-b-Que Nation. The delicious food mixed with discussions about open source and development in various organisations, one of the best parties in my life.
Day 3 - Last Day
Everyone was a little sad because it was the last day but at the same time it was time to make most out of this day. So, my aim as well was to meet, connect and interact with as many people as I can and also attend the talks that interested me. I roamed about trying to gather as much information as I can. It was all so overwhelming. Then we had a staircase DGPLUG meet, where Kushal Das talked about how open source inspires us all and why one should at all do open source. He was surrounded by many students who were new to this entire world, and his talk was so inspiring I felt proud to be a part of open source community.
The day ended with a vote of thanks. Group photos were clicked, promises were made to meet again, last time discussions and sharing of contact details. Though it was the last day, it actually marked a beginning for me - a beginning to be part of such conferences, to meet awesome new people. So now really looking forward to any developer conference and being a part of it.
Resizing Uploaded Image (Python)
Posted: 2016-09-29T18:07:00+05:30
While we make websites where we need to upload images such as in event organizing server, the image for the event needs to be shown in various different sizes in different pages. But an image with high resolution might be an overkill for using at a place where we just need it to be shown as a thumbnail. So what most CMS websites do is re-size the image uploaded and store a smaller image as thumbnail. So how do we do that? Let's find out.
Here, I am going to discuss about how to do it in python. Python has a module named PIL (Python Image Library). We will be using PIL to resize image. Firstly, what we do is store the image in a temporary folder. Then we open the image as PIL Image object.
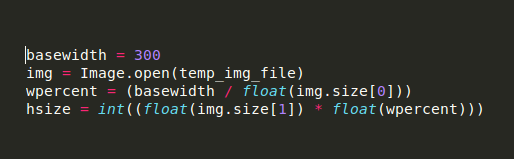
While re-sizing, we maintain the aspect ratio. Firstly, we fix on a particular width of the thumbnail. We get the height from the width fixed keeping the aspect ratio intact using the following code:
After we have the width and height that we want to resize the image to, we use the resize() function of Image class in PIL. It takes a tuple (width, height) as a parameter.

After the image is resized, you can either save it in your local disk or upload it to your storage space.
R14 - Memory Quota Exceeded
Posted: 2016-09-29T18:03:00+05:30
We, like many other organisations, are using heroku as the deployment server for our project open event organizer server. Things are pretty simple and awesome when your project is in its beginning phase and things run pretty smoothly. But as your project grows, there comes some server problem. And one of the biggest problems as your project grows is memory. Now since various packages have a different amount of memory assigned to you in case of hosting in generic servers such as heroku, so it might result in memory quota exceeded. Recently, we faced such a problem. R14 - Memory Quota Exceeded. Took us quite some time to understand what and why and how this occurred. So let me share a few things I found about this error.

So what does this error R14 - Memory Quota Exceeded? According to Heroku error definitions,
A dyno requires memory in excess of its quota. If this error occurs, the dyno will page to swap spaceto continue running, which may cause degraded process performance. The R14 error is calculated by total memory swap and rss; cache is not included.If you are getting a large number of R14 errors, your application performance is likely severely degraded.2011-05-03T17:40:10+00:00 app[worker.1]: Working
2011-05-03T17:40:10+00:00 heroku[worker.1]: Process running mem=1028MB(103.3%)
2011-05-03T17:40:11+00:00 heroku[worker.1]: Error R14 (Memory quota exceeded)
2011-05-03T17:41:52+00:00 app[worker.1]: Working
Basically, this error occurs due to Memory Leaks. A memory leak is defined as memory increasing indefinitely over time. Most applications that have memory problems are defined as having a “memory leak” however if you let those applications run for a long enough period of time, the memory use will level out. In Heroku, R14 means that the main memory quota is exceeded and it starts using swap memory which is really dangerous and the application would surely crash.
So, this errors occur due to too much usage of memory at run-time. There are many different reasons that can cause this and it varies from language to language, application to application. In Flask, some of the common reasons that may cause this error are:
- Too many migrations - Sometimes too many migrations may lead to memory quota being exceeded while migrating your database.
- Too many SQL Queries - If there are too many unnecessary and redundant SQL queries then it might result in the memory quota being exceeded at run-time.
There can be many other reasons. But this is what we faced in our project. Hope this blog helps you to better debug in case of a R14 error in Heroku.
Adding Google Analytics To All Pages Using Flask
Posted: 2016-09-29T18:02:00+05:30Google Analytics gives a detailed insight about your website including how many people visited, time, demography, how many returning visitors and all such information. It's a real important tool to have. All you have to do is create a Universal Analytics Tracking code and use it in a javascript code. The only problem is this code needs to be present in all the pages that you wants the analytics data for. So changing any part of the javascript code anytime, needs to be changed in all .html files.
However, there is a better way of doing it in flask. Create a file base.html and write the code:
<script>
(function(i,s,o,g,r,a,m){i['GoogleAnalyticsObject']=r;i[r]=i[r]||function(){
(i[r].q=i[r].q||[]).push(arguments)},i[r].l=1*new Date();a=s.createElement(o),
m=s.getElementsByTagName(o)[0];a.async=1;a.src=g;m.parentNode.insertBefore(a,m)
})(window,document,'script','https://www.google-analytics.com/analytics.js','ga');ga('create', '<track-code>', 'auto');</script>
ga('send', 'pageview');
Then using the property of jinja2 template extend this file in all the html files, i.e. {% extends 'gentelella/admin/base.html' %}. Thus now when you make some change in the above mentioned javascrpt code, you need to change it only in one place and it is changed in all other places.
Autocomplete Address Form using Google Map API
Posted: 2016-09-29T18:01:00+05:30
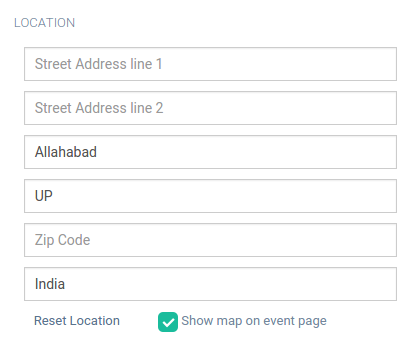
Google map is one of the most widely used API of Google as most of the websites use Google map for showing address location. For a static address it's pretty simple. All you need to do is mention the address and the map will show the nearest location. Problem arrives when the address is dynamically putted by the user. Suppose for an event in event organizer server, one enters the location. The main component used while taking input location is Google Autocomplete. But we went a step further and parsed the entire address based on city, state, country, etc. and allowed user to input the details as well which gave them the nearest location marked in Map if autocomplete couldn't find the address.
Autocomplete Location
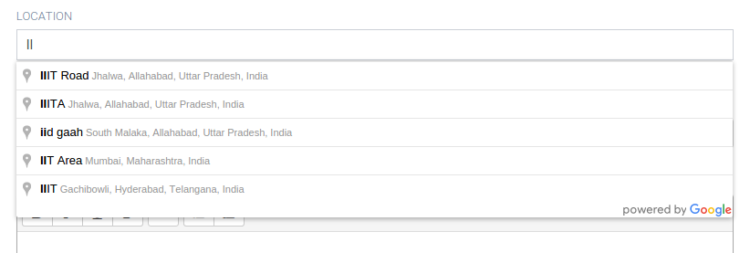
As we can see, in the above input box we get suggestions by Google Map on entering first few letters of our address. To this, we need the API https://maps.googleapis.com/maps/api/js?key=YOUR_API_KEY&libraries=places&callback=initMap. You can find an example code of how to do this here.
After this is done, what we wanted is not to just include this address, but to provide a form to fill up the entire address in case some parts were missing on this address. The function that the autocomplete listens to is "place_changed" . So once we click on one of the options, this event is triggered. Once the event is triggered, we use the autocomplete.getPlace() to get the complete address json. The json looks something like this:
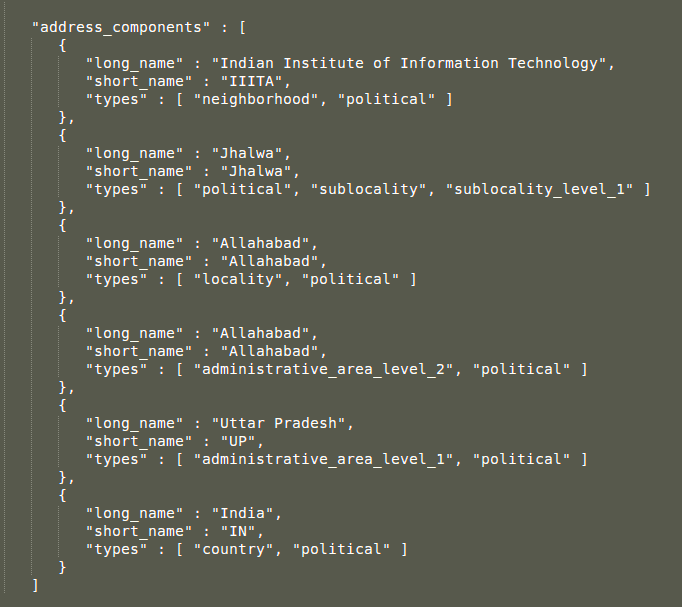
Now what we do is we create a form with input fields having the id same as the ones we require(e.g., country, administrative_area_level_1, locality, etc.). After that we select the long_name or the short_name from this json and put the value in the corresponding input field with the ids. The code for the process after getting the json is elaborated here.
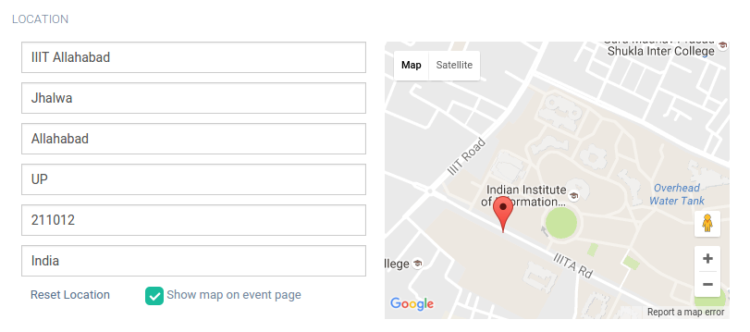
Editing Address Form
After doing this it looks something like this:
However, now the important part is to show the map according to this fields. Also, every time we update a field, the map should be updated. For this we use a hack. Instead of removing the initial location field completely, we hide the field but keep the binding to autocomplete intact. As a result the map is shown when we select a particular address.
Now when we update the fields in the address form, we append the value of this field to the value in the initial location field. Though the field is hidden but it is still bound to autocomplete. As a result as soon as we append something to the string contained in the field, the map gets updated. Also, the updated value gets stored to the DB. Thus, with every update in field, the pointer is moved to the nearest location formed by appending all the data from the form.
After saving the location data to DB, if we wish to edit it, we can get back the json by making the same request with the location value. And then we will get back the same address form and the map accordingly.
Finally it looks something like this:
Configuring Codacy : Use Your Own Conventions
Posted: 2016-07-23T02:12:00+05:30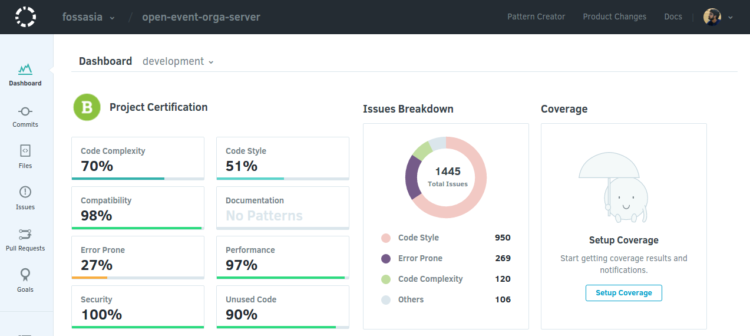
All the developers agree on at least one thing - writing clean code is necessary. Because as someone anonymous said, always write a code as if the developer who comes after you is a homicidal maniac who knows your address. So, yeah, writing clean code is very important. Codacy helps in code reviewing and code quality monitoring. You can set codacy in any of your github project. It automatically identifies new static analysis issues, code coverage, code duplication and code complexity evolution in every commit and pull request.
To maintain a clean code, codacy is really helpful as it reviews all the pull requests, commits and the entire code for you based on code style, code coverage and other metrics..
But as we all know, a perfect code style is very difficult to determine. What is more important is readability and maintainability of the code rather than following a strict code style rules. There are various lint guides such as csslint, jslint, pylint, PEP-8 which give you a good idea about clean code style but they are guidelines rather than rules. So what is important is whatever convention you follow, you follow throughout the code..
So you may need to make some changes in the codacy configuration to check the codebase according to your organisation's coding conventions rather than a standard lint issue. Unfortunately, there is not very good documentation about this. So, I will share a few common changes I found out myself.
Enable / Disable Checks
Firstly you need to have access for the repository to set up proper checks. Otherwise you can only view the reports. If you have proper write access to the repository in github, you will see 2 additional options in the sidebar -
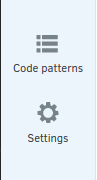
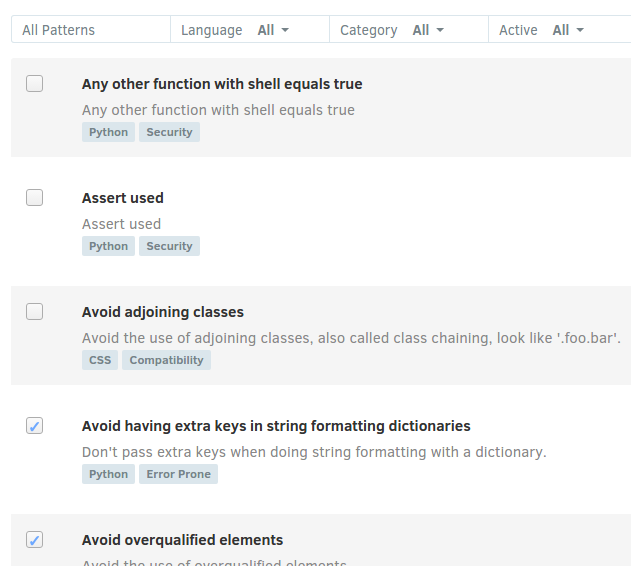
- Code Pattern - List of all the checks available on codacy to review your code
- Settings - Settings involving github repository url, codacy badge, repository name, etc.
To enable or disable a check, you need to click on code patterns options on sidebar. On clicking you will find a page like this:
Now to add or remove a check, you just need to click the checkbox and the configuration is automatically updated.
To see the checks based on language or category, you can click the dropdowns above to select a particular language or category to get checks related to that. For example, there is a javascript lint issue which says "Enforce ===".

This might not be suitable for your project or maybe your team doesn't follow this convention, so you can ignore this check by clicking on the checkbox.
Modify Checks
Now the biggest confusion or controversial point that we all have while talking about clean code is Naming Conventions. There is always an argument whether to use snake_case or camelCase or PascalCase. Different lints consider different naming conventions to be correct. However it is believed that an entire codebase should follow a single naming convention. So, what to do?
Well there is a way to configure this and all other checks. For example, to change naming convention for python codes, you can filter according to python and code style. The you would find a check "Enforces naming convention". To modify the check, click on the "show details" button which you get on hovering over the rule. On clicking the button, you will see something like this:
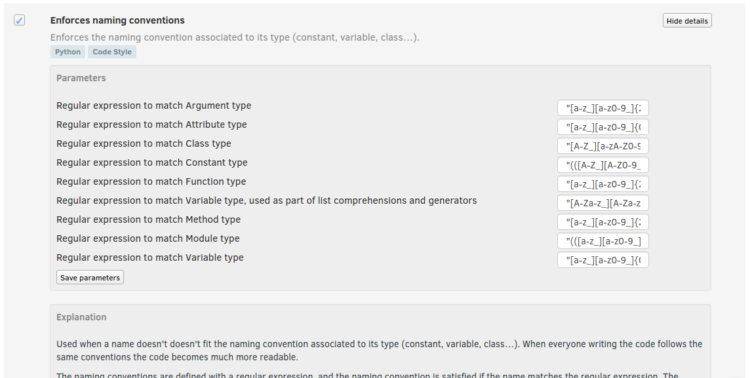
As you can see, there are certain regular expressions present corresponding to various identifier names. Now if you know about regular expressions, you can figure out what this regular expressions. Right now, for our project, the regular expression set for variable type is "[a-z_][a-z0-9_]{0,30}$". This regular expression basically means it allows any variable name in snake_case which has a length between 1 and 29. Now you might feel like you want the variable names to be of at least 5 letters. So you can modify it as "[a-z_][a-z0-9_]{4,30}$". Or suppose you want the variable names to start with uppercase letter. So your regular expression should be something like "[A-Z_][a-z0-9_]{0,30}$". You can check your regular expression our with some example names in regexr.com.
After you have modified the regular expression, click on save parameters. This enforces the new regex to be followed the next time codacy reviews your code.
Re-analyze
After modifying the checks, you might want to re-analyze certain pull requests or commits. This won't be done automatically in an old pull request at that very instance. But you can again enforce this. Click on "Pull Requests" in the sidebar. Select the pull request you want to re-analyze. It would look something like this.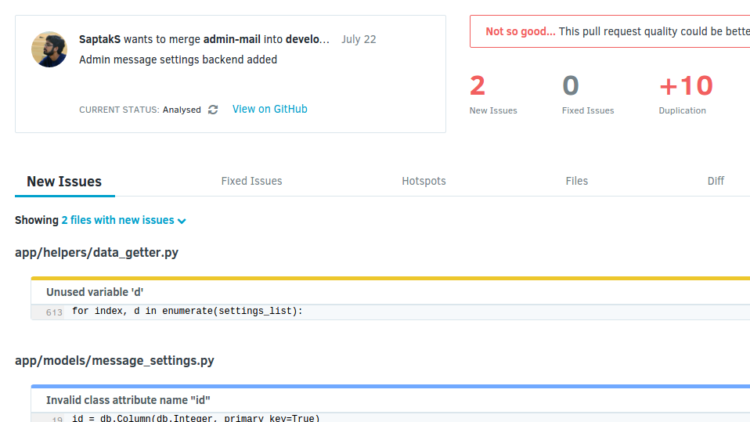
Beside the "CURRENT STATUS: Analysed" you can find a recycle button  . Click on this button, and it will start analyzing the pull request according to the new configurations.
Update Fields with Array Input
Posted: 2016-07-15T22:57:00+05:30
There are certain fields in form where instead of a single value, we need an array of values to be stored. This are fields under the same category but having multiple elements, e.g., Tracks, Session Types, Microlocations, Sponsors, Social Links and similar such fields. Now as we know the way of doing this using simple html is provide the <input> tag with property “name” as “<field_name>[]”. So suppose we want to save the names of the mutliple tracks, we will have something like this

But the problem begins when you want to update name of a particular element (in this case Track). How to do it? Should we delete and create entries again? That doesn’t sound too good, does it? So what should we do? Let’s see….
Delete. Save.
So as said above, one of the easiest way of updating is when you get the updated input, you delete all the previous entries and save the new data again to the DB. Well that works perfectly fine with some fields such as Sponsors because no other table have dependency on Sponsors table. But what if another table has a foreign key constraint on the table you are updating.
For example, Sessions depend on the Tracks table because a session belongs to a particular table. So what happens when we delete a track and then save it again to DB to update. Well, the old track with the actual track_id is lost, which means the session is no more linked to any track or may in fact even be deleted all together depending on your constraint. All in all its a complete disaster!!
Thus, as anyone can say, this is not a good practice. So what should we do?
Use ID to Update
Well, this might seem obvious that we need an ID to edit or update the information, but how do we use tor submit the ID so that it can be used to update data in backend.On way of doing it is hidden input field. You can use an input field which won’t be shown to the user, but contains the ID(e.g. Track ID) which is submitted on the form submit. At the backend you can get the object(Track) using this ID(Track ID), update the values such as name, color, etc., and then save back to the DB. This is pretty effective.

Another way of doing is before the form is submitted, you can send the array of IDs as a data appending to the already existing form data using Javascript. This is also a really effective way of doing.
However there is a small security issue in this one. One might modify the value of hidden input field using javascript hacks or inspect elements which would then actually modify a separate Track which they might not have permission to edit. So, how do we take care of this?

For this we not only filter the data from Table based on the Track ID(or any other ID) but also with the event ID. How this makes editing secure and correctly based on permissions is, users can only edit events in which they have write access. So if they send a POST or PUT request with a particular event ID, they must have permission to edit informations of that event. And since we also filter using event ID so the Tracks ( or any such fields like Session Type) that he can edit will belong to this event which he has permission to write. So this way we can handle the security issue in the backend.
One last thing to take care in backend is suppose we remove a Track while updating which was previously there. So we need to delete this track from the DB. So we make a check whether there was so Track ID presently which is no more present in the form data requested and delete all such entries from the DB.
Sending Email using Sendgrid API
Posted: 2016-07-09T16:47:00+05:30
One of the important features while creating server side code for some website/ web application is sending emails. But how do we send emails. There are different ways and packages using which you can setup SMTP ports and send emails. So why specifically sendgrid? Because along with SMTP relay, sendgrid also allows you to send emails using its Web API which makes work much easier. Here, we will discuss about using Web API.
SendGrid’s Web API sends mail via HTTP. Your server sends a message to SendGrid, and receives either a 250 message, indicating that the message was accepted by the receiving server, or a 400 or 500 message, indicating that something is wrong, prohibiting us from processing the request.
When everything is packaged correctly, SendGrid can process the request and then send it to the intended recipient’s ISP that responds with either a 250 message or a 500 message of their own, informing SendGrid whether or not the message was received. This process is more similar to putting your package in the mailbox and letting the post office review its information and deliver it for you.
Some sample requests:
Authentication:
curl -X "GET" "https://api.sendgrid.com/v3/templates" -H "Authorization: Bearer Your.API.Key-HERE" -H "Content-Type: application/json"Requests:
POST https://api.sendgrid.com/v3/templates/ HTTP/1.1Responses:
Content-Type: application/json
{
"name": "new template name"
}
HTTP/1.1 200 OKErrors:
Content-Type: application/json
{
"foo": "bar",
}
You can go through the various errors from this link: https://sendgrid.com/docs/API_Reference/Web_API_v3/How_To_Use_The_Web_API_v3/errors.html
An example request for email is:
Request:-
POST https://api.sendgrid.com/v3/mail/send HTTP/1.1Request body:-
{Response:-
"personalizations": [
{
"to": [
{
"email": "john@example.com"
}
],
"subject": "Hello, World!"
}
],
"from": {
"email": "from_address@example.com"
},
"content": [
{
"type": "text",
"value": "Hello, World!"
}
]
}
{
HTTP/1.1 202
}